CGI Step-by-Step: Guide to a Successful Project
The strategic process behind CGI LinkedIn Introduction Adopting CGI (Computer-Generated Imagery) is a strategic leap that offers incomparable visual quality and superior cost efficiency compared to traditional photography. However, this change involves not only technology but also a distinct project management methodology. A successful CGI project does not solely depend on the technical skill of the 3D artist, but on impeccable planning, communication, and supervision.Many projects fail not because of the final render, but because of an ambiguous briefing or the lack of a structured approval workflow. Ignoring these management steps results in endless revisions and blown budgets.In this comprehensive guide, we will break down the management of a CGI project into 7 essential phases, focusing on the decisions you, as a brand leader or project manager, must make. You will learn how to elaborate the perfect briefing, establish critical approval milestones, and ensure that the digital assets generated serve you in the long term. Prepare to master CGI project management and secure results that drive your brand strategy. The CGI Process: 7 Critical Management Phases The key to success in CGI is treating every project as an asset investment, not just a simple photoshoot. Phase 1: Strategic Briefing and Asset Definition (Kick-Off) This is the planning phase where the «why» and «how» of the project are defined. Requirement Definition: Specify the final use (e-commerce, print advertising, AR). This defines the level of detail, resolution, and complexity of the 3D model. Data Gathering: Provide the 3D team with all CAD blueprints, color specifications (Pantone codes), and texture samples. The precision of the input is the key to the precision of the output. Deliverable Establishment: Determine the exact number of renders (angles), the type of lighting, and the background (white background, photorealistic environment, fantasy). Phase 2: Base Model Approval (Wireframe & Geometry) Before investing time in textures and lights, the manager must verify the shape and scale of the digital asset. Critical Milestone: The 3D team delivers a «grey» render or a wireframe of the model. Geometry Validation: The client verifies that the proportions, curves, and dimensions of the digital model exactly match the physical product or prototype. Decision: No project should proceed without formal approval of the geometry. Correcting the shape at this stage is fast; doing it after texturing is costly. Phase 3: Materials and Textures Approval This guarantees that the final finish is authentic. Material Testing: The 3D team presents close-up renders that show how light interacts with the textures (e.g., the sheen of chrome, the roughness of leather). Photorealistic Adjustment: The manager must compare the texture render with the physical product sample. If the finish is matte or semi-glossy, it must be reflected with total precision. Brand Consistency: Final colors are approved using the Pantone or HEX references established in Phase 1. Phase 4: Composition, Lighting, and Scene Approval This phase is the virtual art direction; the «look and feel» of the render is defined. Composition Proposal: The team presents sketches or low-resolution renders with the camera and the lighting setup proposed for each shot. Narrative Validation: The brand manager approves the composition that best communicates the product’s message. Is the light soft and luxurious or harsh and dramatic? Set Dressing Approval: If background elements are added (e.g., a plant or a wooden background), they are approved to ensure they reinforce the main product and do not distract from it. Phase 5: High-Resolution Rendering and Pre-Delivery Once all aspects have been approved in low resolution, the final render is executed. Final Render Execution: The 3D team generates the image or animation at the highest resolution and with the maximum required sampling quality. Render Passes Generation: It is ensured that the light and shadow layers (passes) are generated for flexibility in post-production. Quality Control (QC): A comprehensive review is conducted to detect any digital «noise,» artifacts, or errors in reflections before sending it to the client. Phase 6: Post-Production, Final Retouching, and Final Approval The human touch that refines digital perfection. Color and Contrast Adjustment: The post-producer uses the render passes to make subtle colorimetry and contrast adjustments, giving it the final punch. Version Control: The brand gives the final approval. It is crucial that any feedback at this stage is minimal, as structural changes should have been resolved in Phases 2-4. Final Decision: The image is approved as ready for distribution in digital or print channels. Phase 7: Delivery and Digital Asset Library Creation (Long-Term Investment) Success does not end with the final image, but with the capitalization of the 3D asset. Complete Delivery: Delivery of the final image and, most importantly, the 3D source files (the digital asset). Archiving and Cataloging: The 3D model is cataloged and stored in the brand’s Digital Asset Library. Long-Term Benefit: This library allows for re-rendering the same product for future campaigns (e.g., changing the background or lighting in minutes) or using the model for Augmented Reality experiences without additional modeling costs. This maximizes the ROI of the CGI project. Conclusion A CGI project is a scalable investment. By implementing these 7 management phases, your team transforms creative uncertainty into a predictable and highly controllable process. The true value of CGI lies in the methodical creation and archiving of your Digital Asset Library, ensuring that your investment today provides you with flexibility and efficiency for years to come.Are you ready to implement a CGI methodology that guarantees high-quality renders and maximized ROI? Contact us today to design your 3D production workflow.
CGI Paso a Paso: Guía para un Proyecto Exitoso
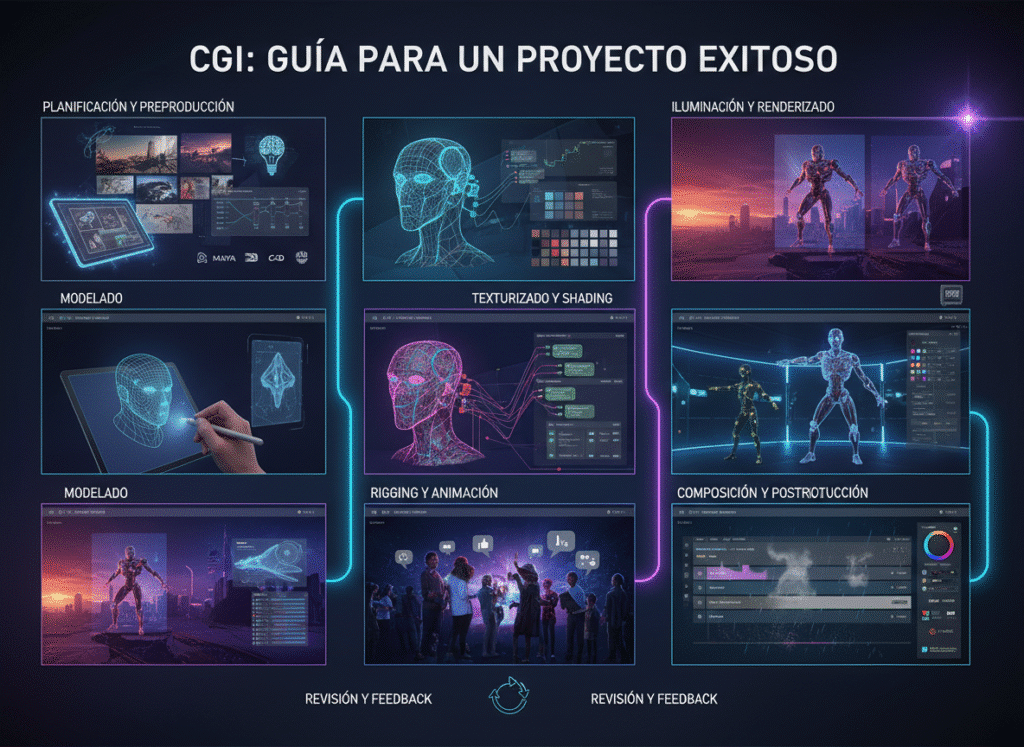
Proceso estratégico detrás del CGI LinkedIn Introducción Adoptar el CGI (Imágenes Generadas por Computadora) es un salto estratégico que ofrece una calidad visual incomparable y una eficiencia de costos superior a la fotografía tradicional. Sin embargo, este cambio no solo implica tecnología, sino una metodología de gestión de proyectos distinta. Un proyecto de CGI exitoso no depende únicamente de la habilidad técnica del artista 3D, sino de una planificación, comunicación y supervisión impecables.Muchos proyectos fracasan no por el render final, sino por un briefing ambiguo o por la falta de un flujo de aprobación estructurado. Ignorar estos pasos de gestión resulta en revisiones interminables y presupuestos desbordados.En esta guía exhaustiva, desglosaremos la gestión de un proyecto de CGI en 7 fases esenciales, enfocándonos en las decisiones que tú, como líder de marca o gestor de proyecto, debes tomar. Aprenderás a elaborar el briefing perfecto, establecer hitos de aprobación críticos y asegurar que los activos digitales generados te sirvan a largo plazo. Prepárate para dominar la gestión de proyectos CGI y asegurar resultados que impulsen la estrategia de tu marca. El Proceso CGI: 7 Fases Críticas de Gestión La clave del éxito en CGI es tratar cada proyecto como una inversión de activos, no como una simple sesión de fotos. Fase 1: El Briefing Estratégico y la Definición del Activo (Kick-Off) Esta es la fase de planificación donde se define el «por qué» y el «cómo» del proyecto. Definición de Requerimientos: Especificar el uso final (e-commerce, publicidad impresa, AR). Esto define el nivel de detalle, la resolución y la complejidad del modelo 3D. Recopilación de Datos: Proporcionar al equipo 3D todos los planos CAD, especificaciones de color (códigos Pantone) y muestras de textura. La precisión del input es la clave para la precisión del output. Establecimiento de Entregables: Determinar el número exacto de renders (ángulos), el tipo de iluminación y el fondo (fondo blanco, entorno fotorrealista, fantasía). Fase 2: Aprobación del Modelo Base (Wireframe & Geometría) Antes de invertir tiempo en texturas y luces, el gestor debe verificar la forma y la escala del activo digital. Hito Crítico: El equipo 3D entrega un render «gris» o un wireframe del modelo. Validación de Geometría: El cliente verifica que las proporciones, las curvas y las dimensiones del modelo digital coincidan exactamente con el producto físico o el prototipo. Decisión: Ningún proyecto debe avanzar sin la aprobación formal de la geometría. Corregir la forma en esta etapa es rápido; hacerlo después del texturizado es costoso. Fase 3: Aprobación de Materiales y Texturas Aquí se garantiza que el acabado final sea auténtico. Pruebas de Material: El equipo 3D presenta renders de cerca (close-ups) que muestran cómo interactúa la luz con las texturas (ej. el brillo del cromo, la rugosidad del cuero). Ajuste Fotorrealista: El gestor debe comparar el render de la textura con la muestra física del producto. Si el acabado es mate o semi-brillante, debe reflejarse con total precisión. Consistencia de Marca: Se aprueban los colores finales usando las referencias Pantone o HEX establecidas en la Fase 1. Fase 4: Composición, Iluminación y Aprobación de Escena Esta fase es la dirección de arte virtual; se define el «look and feel» del render. Propuesta de Composición: El equipo presenta bocetos o renders de baja resolución con la cámara y la iluminación (lighting setup) propuestas para cada shot. Validación de la Narrativa: El gestor de marca aprueba la composición que mejor comunica el mensaje del producto. ¿La luz es suave y lujosa o dura y dramática? Aprobación del Set Dressing: Si se añaden elementos de fondo (ej. una planta o un background de madera), se aprueban para asegurar que refuercen el producto principal y no lo distraigan. Fase 5: Renderizado de Alta Resolución y Pre-Entrega Una vez que todos los aspectos han sido aprobados en baja resolución, el render final se pone en marcha. Ejecución del Render Final: El equipo 3D genera la imagen o animación en la resolución más alta y con la máxima calidad de sampling requerida. Generación de Render Passes: Se asegura que se generen las capas (passes) de luz y sombra para la flexibilidad en la postproducción (Punto 5: sinónimos). Control de Calidad (QC): Se hace una revisión exhaustiva para detectar cualquier «ruido» digital, artefacto o error en los reflejos antes de enviarlo al cliente. Fase 6: Postproducción, Retoque Final y Aprobación Final El toque humano que refina la perfección digital. Ajuste de Color y Contraste: El post-productor utiliza los render passes para hacer ajustes sutiles de colorimetría y contraste, dándole el punch final. Control de Versiones: La marca da la aprobación final. Es crucial que cualquier feedback en esta etapa sea mínimo, ya que los cambios estructurales deben haberse resuelto en las Fases 2-4. Decisión Final: Se aprueba la imagen como lista para su distribución en canales digitales o impresos. Fase 7: Entrega y Creación de la Biblioteca de Activos (Inversión a Largo Plazo) El éxito no termina con la imagen final, sino con la capitalización del activo 3D. Entrega Completa: Entrega de la imagen final y, lo más importante, de los archivos fuente 3D (el activo digital). Archivo y Catalogación: El modelo 3D se cataloga y almacena en la Biblioteca de Activos Digitales de la marca. Beneficio a Largo Plazo: Esta biblioteca permite re-renderizar ese mismo producto para futuras campañas (ej. cambiar el fondo o la iluminación en minutos) o usar el modelo para experiencias de Realidad Aumentada sin costo adicional de modelado. Esto maximiza el ROI del proyecto CGI (Punto 5). Conclusión Un proyecto de CGI es una inversión escalable. Al implementar estas 7 fases de gestión, tu equipo transforma la incertidumbre creativa en un proceso predecible y altamente controlable. El verdadero valor del CGI reside en la creación y archivo metódico de tu Biblioteca de Activos Digitales, asegurando que tu inversión hoy te brinde flexibilidad y eficiencia en los años venideros. ¿Listo para implementar una metodología de CGI que garantice renders de alta calidad y un ROI
